Create a React dapp with global state
This tutorial walks you through integrating a React dapp with MetaMask. The dapp has multiple components, so requires managing global state. You'll use the Vite build tool with React and TypeScript to create the dapp.
We recommend first creating a React dapp with local state. This tutorial is a follow-up to that tutorial.
The previous tutorial walks you through creating a dapp that connects to MetaMask and handles account, balance, and network changes with a single component. In real world use cases, a dapp might need to respond to state changes in different components.
In this tutorial, you'll move that state and its relevant functions into React context, creating a global state so other components and UI can affect it and get MetaMask wallet updates.
This tutorial also provides a few best practices for a clean code base, since you'll have multiple components and a slightly more complex file structure.
You can see the source code for the starting point and final state of this dapp.
Prerequisites
- Node.js version 18+
- npm version 9+
- A text editor (for example, VS Code)
- The MetaMask extension installed
- Basic knowledge of TypeScript, React and React Hooks
Steps
1. Set up the project
Clone the react-dapp-tutorial GitHub repository
on GitHub by running the following command:
git clone https://github.com/MetaMask/react-dapp-tutorial.git
Checkout the global-state-start branch:
cd react-dapp-tutorial && git checkout global-state-start
Install the node module dependencies:
npm install
Open the project in a text editor.
If you use VS Code, you can run the command code . to open the project.
This is a working React dapp, but it's wiped out the code from the previous tutorial's
App.tsx file.
Run the dapp using the command npx vite.
The starting point looks like the following:
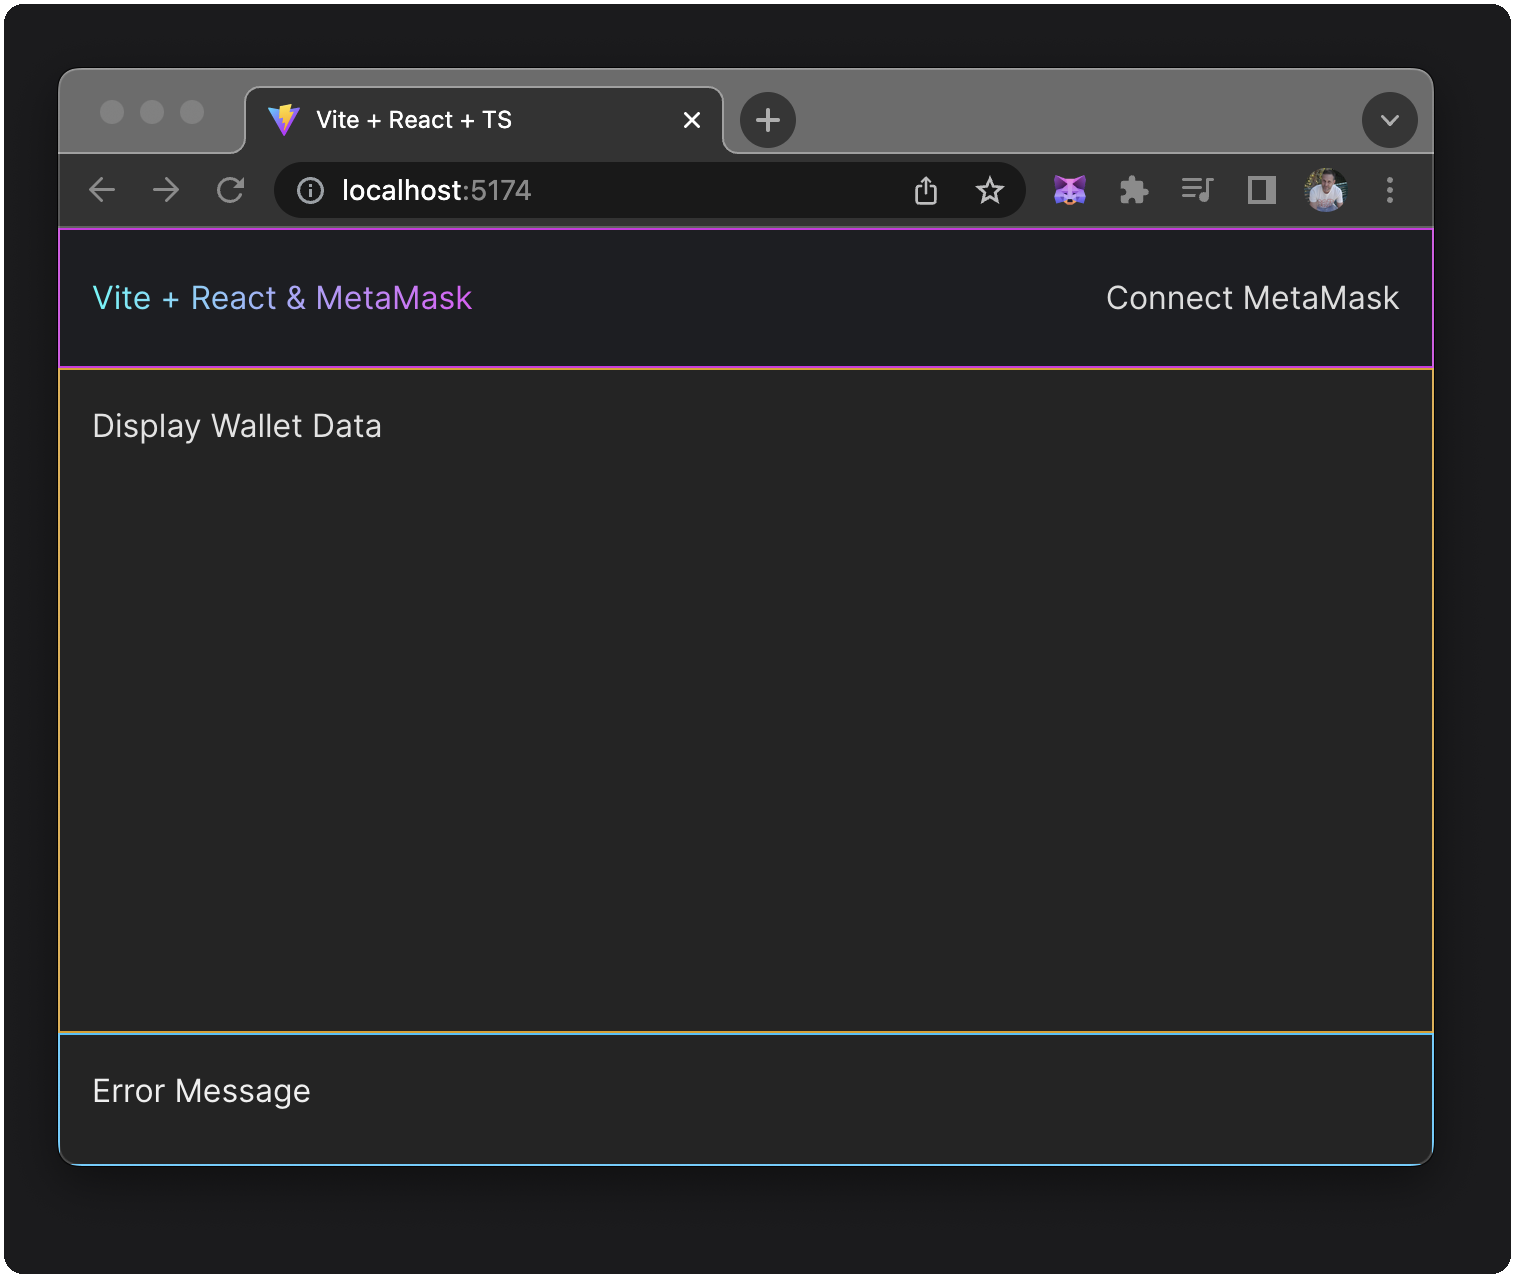
There are three components, each with static text: navigation (with a logo area and connect button), display (main content area), and footer. You'll use the footer to show any MetaMask errors.
Before you start, comment out or remove the border CSS selector, as it's only used as a visual aid.
Remove the following line from each component style sheet:
// border: 1px solid rgb(...);
Styling
This dapp has Vite's typical App.css and index.css files removed, and uses a modular approach to CSS.
In the /src directory, App.global.css contains styles for the entire dapp (not specific to a
single component), and styles you might want to reuse (such as buttons).
In the /src directory, App.module.css contains styles specific to App.tsx, your dapp's
container component.
It uses the appContainer class, which sets up a
Flexbox to define the display type
(flex) and the flex-direction (column).
Using Flexbox here ensures that any child divs are laid out in a single-column layout (vertically).
Finally, the /src/components directory has subdirectories for Display, Navigation, and MetaMaskError.
Each subdirectory contains a corresponding component file and CSS file.
Each component is a
flex-items
within a
flex-container,
stacked in a vertical column with the navigation and footer (MetaMaskError) being of fixed height
and the middle component (Display) taking up the remaining vertical space.
Optional: Linting with ESLint
This dapp uses a standard ESLint configuration to keep the code consistent. There are two ways to use ESLint:
Run
npm run lintornpm run lint:fixfrom the command line. The former displays all the linting errors, and the latter updates your code to fix linting errors where possible.Set up your IDE to show linting errors and automatically fix them on save. For example, in VS Code, you can create or update the file at
.vscode/settings.jsonin the root of the project with the following settings:settings.json{
"eslint.format.enable": true,
"eslint.packageManager": "npm",
"editor.codeActionsOnSave": {
"source.fixAll.eslint": true
},
"eslint.codeActionsOnSave.mode": "all"
}
Project structure
The following is a tree representation of the dapp's /src directory:
├── src
│   ├── assets
│   ├── components
│   │   └── Display
│   │   |   └── index.tsx
│   │   |   └── Display.module.css
│   │   |   └── Display.tsx
│   │   ├── MetaMaskError
│   │   |   └── index.tsx
│   │   |   └── MetaMaskError.module.css
│   │   |   └── MetaMaskError.tsx
│   │   ├─── Navigation
│   │   |   └── index.tsx
│   │   |   └── Navigation.module.css
│   │   |   └── Navigation.tsx
│   ├── hooks
│   │   ├── useMetaMask.tsx
│   ├── utils
│   │   └── index.tsx
├── App.global.css
├── App.module.css
├── App.tsx
├── main.tsx
├── vite-env.d.ts
Instead of a single component, there's a src/components directory with UI and functionality
distributed into multiple components.
You'll modify the dapp's state in this directory and make it available to the rest of the dapp using
a context provider.
This provider will sit in the src/App.tsx file and wrap the three child components.
The child components will have access to the global state and the functions that modify the global state.
This ensures that any change to the wallet (address, balance, and chainId), or the global
state's properties and functions (hasProvider, error, errorMessage, and isConnecting) will
be accessible by re-rendering those child components.
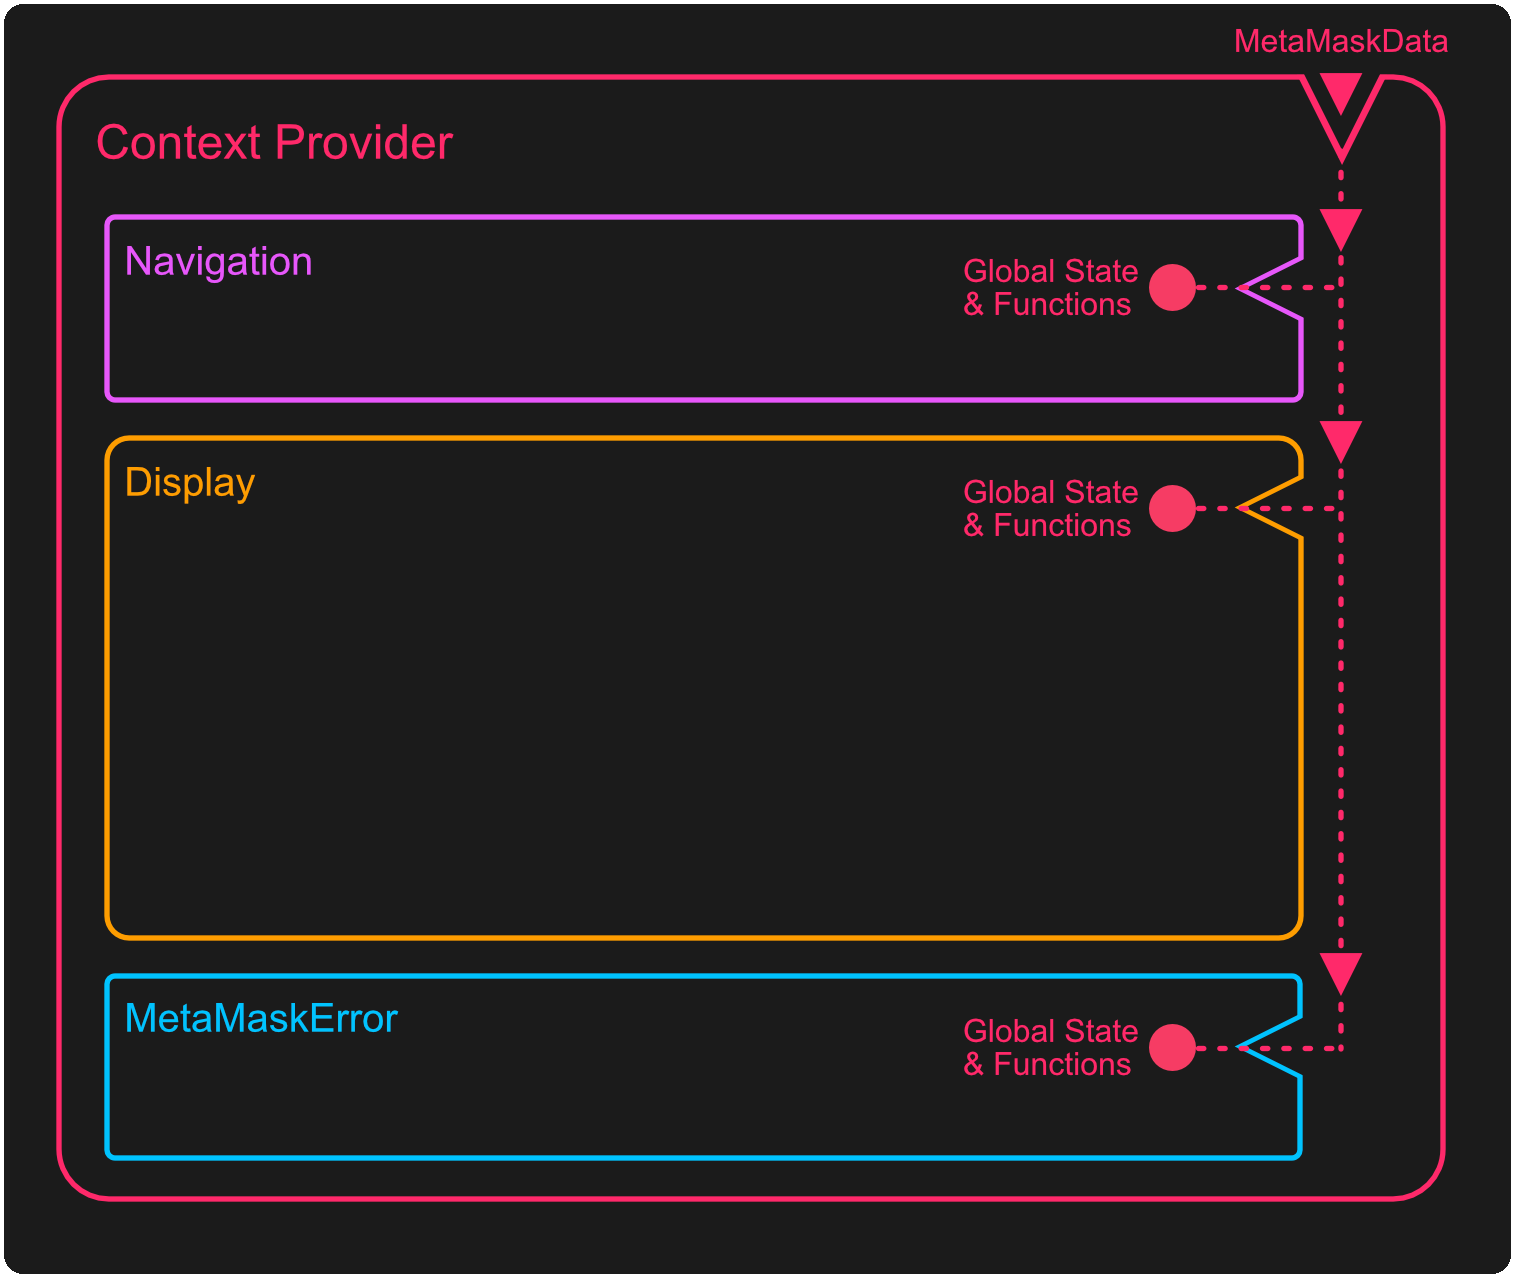
The following graphic shows how the context provider wraps its child components, providing access to the state modifier functions and the actual state itself. Since React uses a one-way data flow, any change to the data gets re-rendered in those components automatically.
2. Build the context provider
In this step, you'll create a context called MetaMaskContext and a provider component called
MetaMaskContextProvider in the /src/hooks/useMetaMask.tsx file.
This provider component will use similar useState and useEffect hooks with some changes from
the previous tutorial's local state component to make it more DRY (don't repeat yourself).
It will also have similar updateWallet, connectMetaMask, and clearError functions, all of
which do their part to connect to MetaMask or update the MetaMask state.
MetaMaskContext will return a MetaMaskContext.Provider, which takes a value of type
MetaMaskContextData, and supplies that to its children.
You'll export a React hook called useMetaMask, which uses your MetaMaskContext.
Update /src/hooks/useMetaMask.tsx with the following:
The following code contains comments describing advanced React patterns and how MetaMask state is managed.
/* eslint-disable @typescript-eslint/no-explicit-any */
import { useState, useEffect, createContext, PropsWithChildren, useContext, useCallback } from 'react'

import detectEthereumProvider from '@metamask/detect-provider'
import { formatBalance } from '~/utils'

interface WalletState {
  accounts: any[]
  balance: string
  chainId: string
}

interface MetaMaskContextData {
  wallet: WalletState
  hasProvider: boolean | null
  error: boolean
  errorMessage: string
  isConnecting: boolean
  connectMetaMask: () => void
  clearError: () => void
}

const disconnectedState: WalletState = { accounts: [], balance: '', chainId: '' }

const MetaMaskContext = createContext<MetaMaskContextData>({} as MetaMaskContextData)

export const MetaMaskContextProvider = ({ children }: PropsWithChildren) => {
  const [hasProvider, setHasProvider] = useState<boolean | null>(null)

  const [isConnecting, setIsConnecting] = useState(false)

  const [errorMessage, setErrorMessage] = useState('')
  const clearError = () => setErrorMessage('')

  const [wallet, setWallet] = useState(disconnectedState)
  // useCallback ensures that you don't uselessly recreate the _updateWallet function on every render
  const _updateWallet = useCallback(async (providedAccounts?: any) => {
    const accounts = providedAccounts || await window.ethereum.request(
      { method: 'eth_accounts' },
    )

    if (accounts.length === 0) {
      // If there are no accounts, then the user is disconnected
      setWallet(disconnectedState)
      return
    }

    const balance = formatBalance(await window.ethereum.request({
      method: 'eth_getBalance',
      params: [accounts[0], 'latest'],
    }))
    const chainId = await window.ethereum.request({
      method: 'eth_chainId',
    })

    setWallet({ accounts, balance, chainId })
  }, [])

  const updateWalletAndAccounts = useCallback(() => _updateWallet(), [_updateWallet])
  const updateWallet = useCallback((accounts: any) => _updateWallet(accounts), [_updateWallet])

  /**
   * This logic checks if MetaMask is installed. If it is, some event handlers are set up
   * to update the wallet state when MetaMask changes. The function returned by useEffect
   * is used as a "cleanup": it removes the event handlers whenever the MetaMaskProvider
   * is unmounted.
   */
  useEffect(() => {
    const getProvider = async () => {
      const provider = await detectEthereumProvider({ silent: true })
      setHasProvider(Boolean(provider))

      if (provider) {
        updateWalletAndAccounts()
        window.ethereum.on('accountsChanged', updateWallet)
        window.ethereum.on('chainChanged', updateWalletAndAccounts)
      }
    }

    getProvider()

    return () => {
      window.ethereum?.removeListener('accountsChanged', updateWallet)
      window.ethereum?.removeListener('chainChanged', updateWalletAndAccounts)
    }
  }, [updateWallet, updateWalletAndAccounts])

  const connectMetaMask = async () => {
    setIsConnecting(true)

    try {
      const accounts = await window.ethereum.request({
        method: 'eth_requestAccounts',
      })
      clearError()
      updateWallet(accounts)
    } catch(err: any) {
      setErrorMessage(err.message)
    }
    setIsConnecting(false)
  }

  return (
    <MetaMaskContext.Provider
      value={{
        wallet,
        hasProvider,
        error: !!errorMessage,
        errorMessage,
        isConnecting,
        connectMetaMask,
        clearError,
      }}
    >
      {children}
    </MetaMaskContext.Provider>
  )
}

export const useMetaMask = () => {
  const context = useContext(MetaMaskContext)
  if (context === undefined) {
    throw new Error('useMetaMask must be used within a "MetaMaskContextProvider"')
  }
  return context
}
With this context provider in place, you can update /src/App.tsx to include the provider and wrap
it around the three components.
Notice the use of ~/utils to import the utility functions.
This dapp is configured to use vite-tsconfig-paths, allowing it to load modules with locations
specified by the compilerOptions.paths object in tsconfig.json.
The path corresponding to the ./src/* directory is represented by the ~/* symbol.
There's also a reference to ./tsconfig.node.json in the reference's array objects that correspond
to path.
vite.config.ts imports tsconfigPaths from vite-tsconfig-paths and adds it to the plugins array.
See more information about vite-tsconfig-paths.
3. Wrap components with the context provider
In this step, you'll import the MetaMaskContextProvider in /src/App.tsx and wrap that component
around the existing Display, Navigation, and MetaMaskError components.
Update /src/App.tsx to the following:
import './App.global.css'
import styles from './App.module.css'

import { Navigation } from './components/Navigation'
import { Display } from './components/Display'
import { MetaMaskError } from './components/MetaMaskError'
import { MetaMaskContextProvider } from './hooks/useMetaMask'

export const App = () => {

  return (
    <MetaMaskContextProvider>
      <div className={styles.appContainer}>
        <Navigation />
        <Display />
        <MetaMaskError />
      </div>
    </MetaMaskContextProvider>
  )
}
With App.tsx updated, you can update the Display, Navigation, and MetaMaskError components,
each of which will use the useMetaMask hook to display the state or invoke functions that modify state.
4. Connect to MetaMask in the navigation
The Navigation component will connect to MetaMask using conditional rendering to show an
Install MetaMask or Connect MetaMask button or, once connected, display your wallet address
in a hypertext link that connects to Etherscan.
Update /src/components/Navigation/Navigation.tsx to the following:
import { useMetaMask } from '~/hooks/useMetaMask'
import { formatAddress } from '~/utils'
import styles from './Navigation.module.css'

export const Navigation = () => {

  const { wallet, hasProvider, isConnecting, connectMetaMask } = useMetaMask()

  return (
    <div className={styles.navigation}>
      <div className={styles.flexContainer}>
        <div className={styles.leftNav}>Vite + React & MetaMask</div>
        <div className={styles.rightNav}>
          {!hasProvider &&
            <a href="https://metamask.io" target="_blank">
              Install MetaMask
            </a>
          }
          {window.ethereum?.isMetaMask && wallet.accounts.length < 1 &&
            <button disabled={isConnecting} onClick={connectMetaMask}>
              Connect MetaMask
            </button>
          }
          {hasProvider && wallet.accounts.length > 0 &&
            <a
              className="text_link tooltip-bottom"
              href={`https://etherscan.io/address/${wallet}`}
              target="_blank"
              data-tooltip= "Open in Block Explorer"
            >
              {formatAddress(wallet.accounts[0])}
            </a>
          }
        </div>
      </div>
    </div>
  )
}
Notice how useMetaMask de-structures its return value to get the items within MetaMaskContextData:
const { wallet, hasProvider, isConnecting, connectMetaMask } = useMetaMask()
Also, the formatAddress function formats the wallet address for display purposes:
{formatAddress(wallet.accounts[0])}
This function doesn't exist in the @utils file yet, so you'll need to add it.
Update /src/utils/index.tsx to the following:
export const formatBalance = (rawBalance: string) => {
  const balance = (parseInt(rawBalance) / 1000000000000000000).toFixed(2)
  return balance
}

export const formatChainAsNum = (chainIdHex: string) => {
  const chainIdNum = parseInt(chainIdHex)
  return chainIdNum
}

export const formatAddress = (addr: string) => {
  return `${addr.substring(0, 8)}...`
}
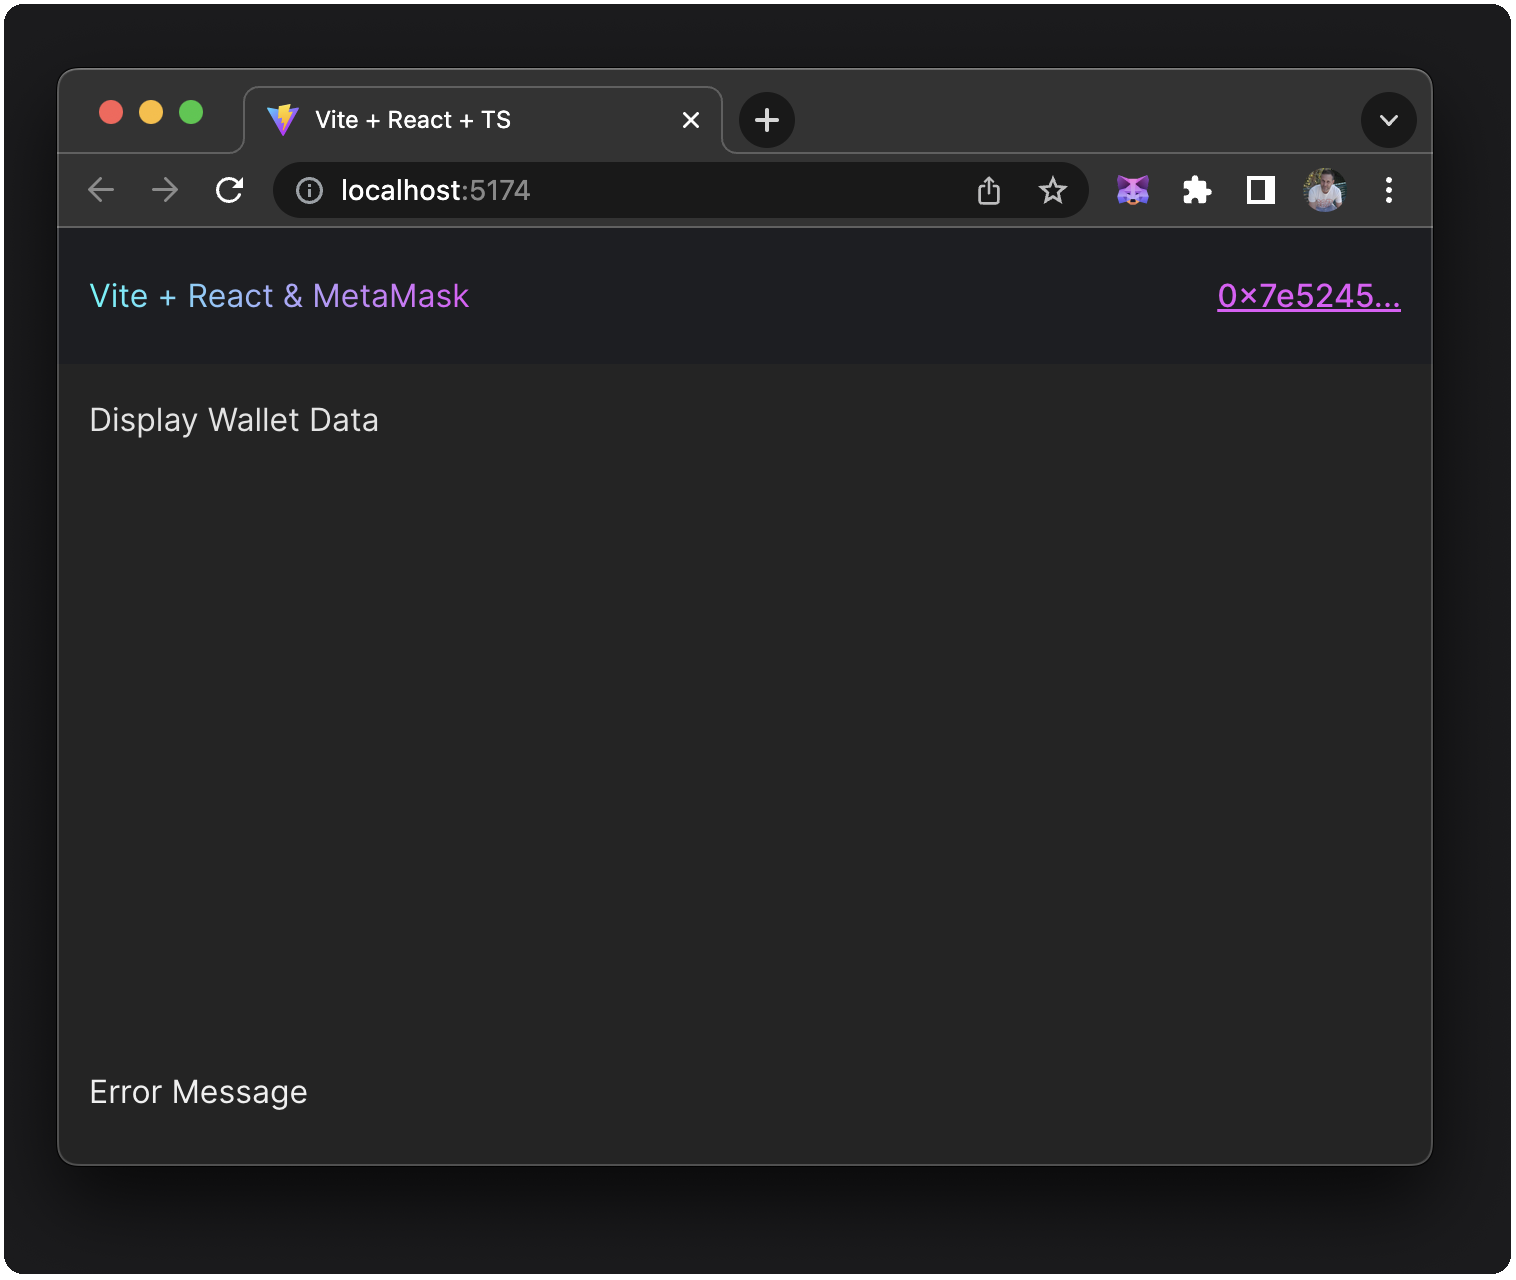
This should address any build errors in your Navigation component.
Other than using the new styling, the only thing this dapp has done differently than the local-state
tutorial is display the user's address formatted inside a link once they're connected.
Now that you have a place for connecting and showing the address, you could build out an entire
profile component (side quest).
5. Display MetaMask data
In the Display component, you won't call any functions that modify state; you'll read from
MetaMaskData, a simple update.
Update /src/components/Display/Display.tsx to the following:
import { useMetaMask } from '~/hooks/useMetaMask'
import { formatChainAsNum } from '~/utils'
import styles from './Display.module.css'

export const Display = () => {

  const { wallet } = useMetaMask()

  return (
    <div className={styles.display}>
      {wallet.accounts.length > 0 &&
        <>
          <div>Wallet Accounts: {wallet.accounts[0]}</div>
          <div>Wallet Balance: {wallet.balance}</div>
          <div>Hex ChainId: {wallet.chainId}</div>
          <div>Numeric ChainId: {formatChainAsNum(wallet.chainId)}</div>
        </>
      }
    </div>
  )
}
Notice how useMetaMask de-structures its return value to get only the wallet data:
const { wallet } = useMetaMask()
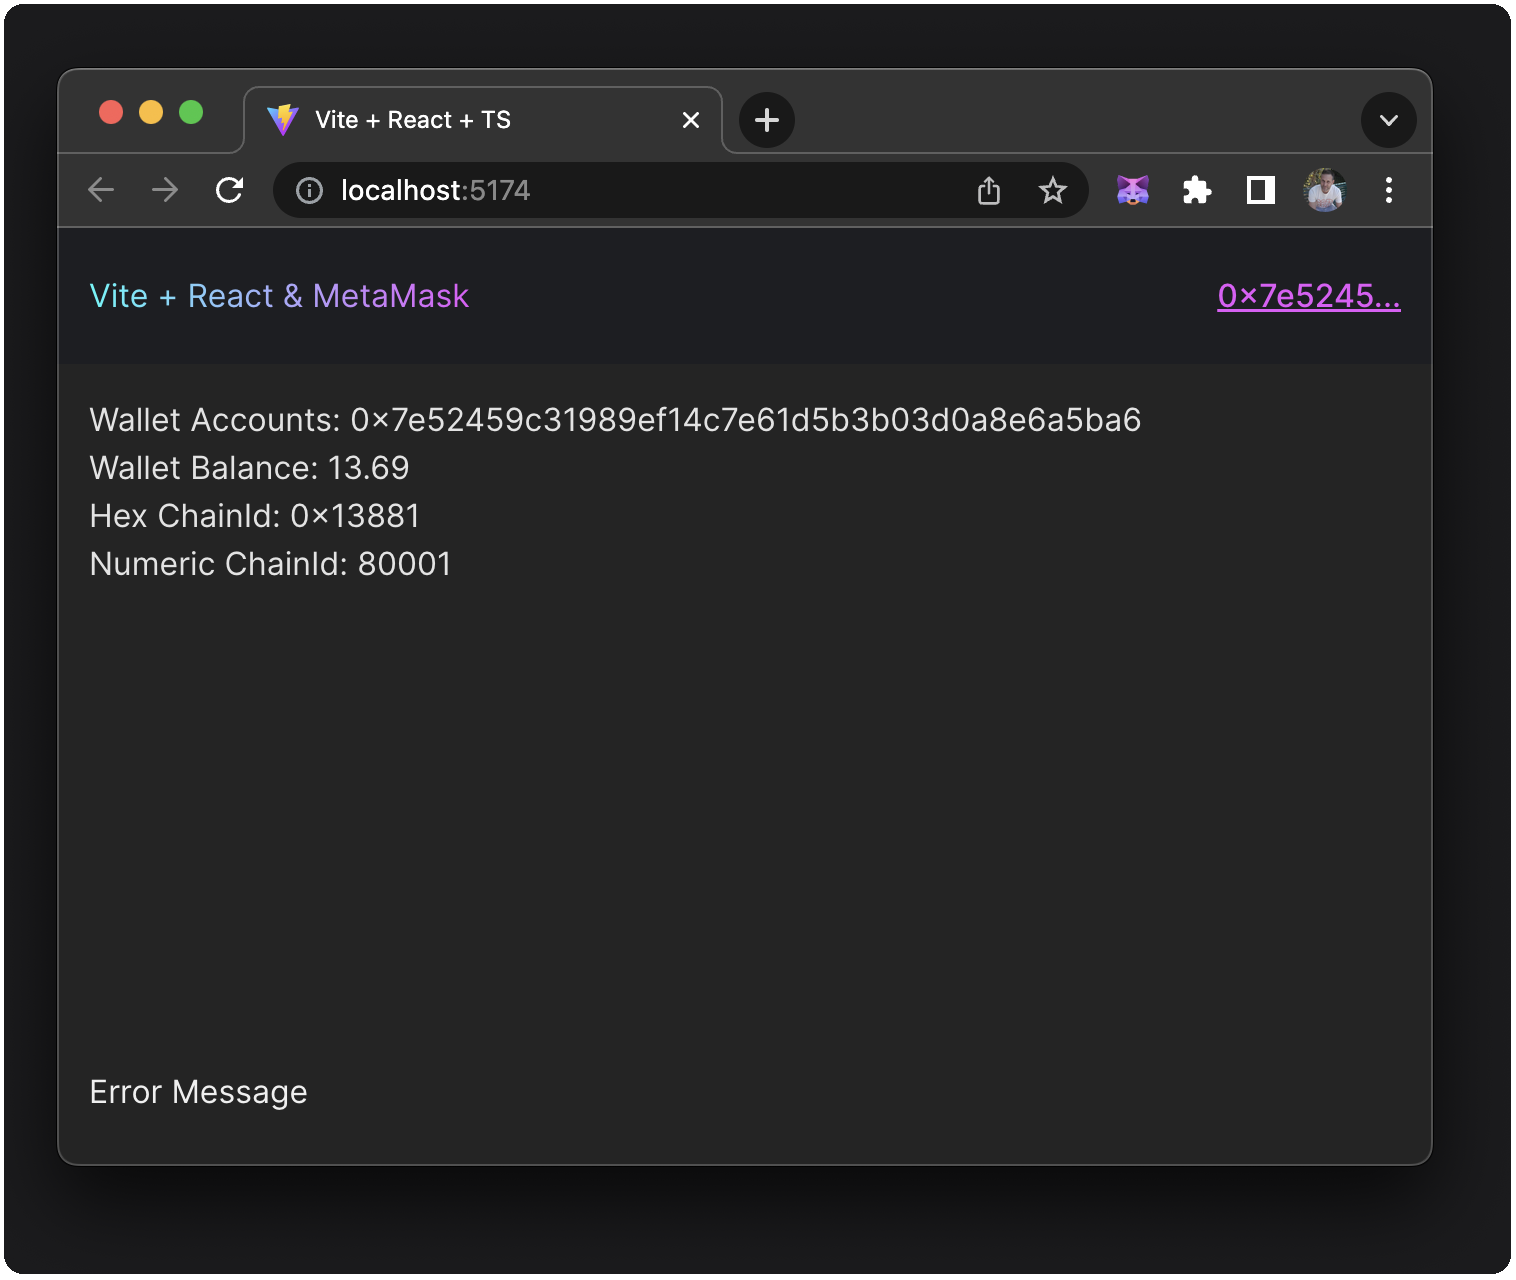
At this point, you can display account, balance, and chainId in the Display component:
6. Show MetaMask errors in the footer
If MetaMask errors or the user rejects a connection, you can display that error in the footer, or
MetaMaskError component.
Update /src/components/MetaMaskError/MetaMaskError.tsx to the following:
import { useMetaMask } from '~/hooks/useMetaMask'
import styles from './MetaMaskError.module.css'

export const MetaMaskError = () => {
  const { error, errorMessage, clearError } = useMetaMask()
  return (
    <div className={styles.metaMaskError} style={
      error ? { backgroundColor: 'brown' } : {}
    }>
      { error && (
        <div onClick={clearError}>
          <strong>Error:</strong> {errorMessage}
        </div>
      )
      }
    </div>
  )
}
Notice how useMetaMask de-structures its return value to get only the error, errorMessage, and
clearError data:
const { error, errorMessage, clearError } = useMetaMask()
When you generate an error by cancelling the connection to MetaMask, this shows up in the footer. The background temporarily turns a dark red color:
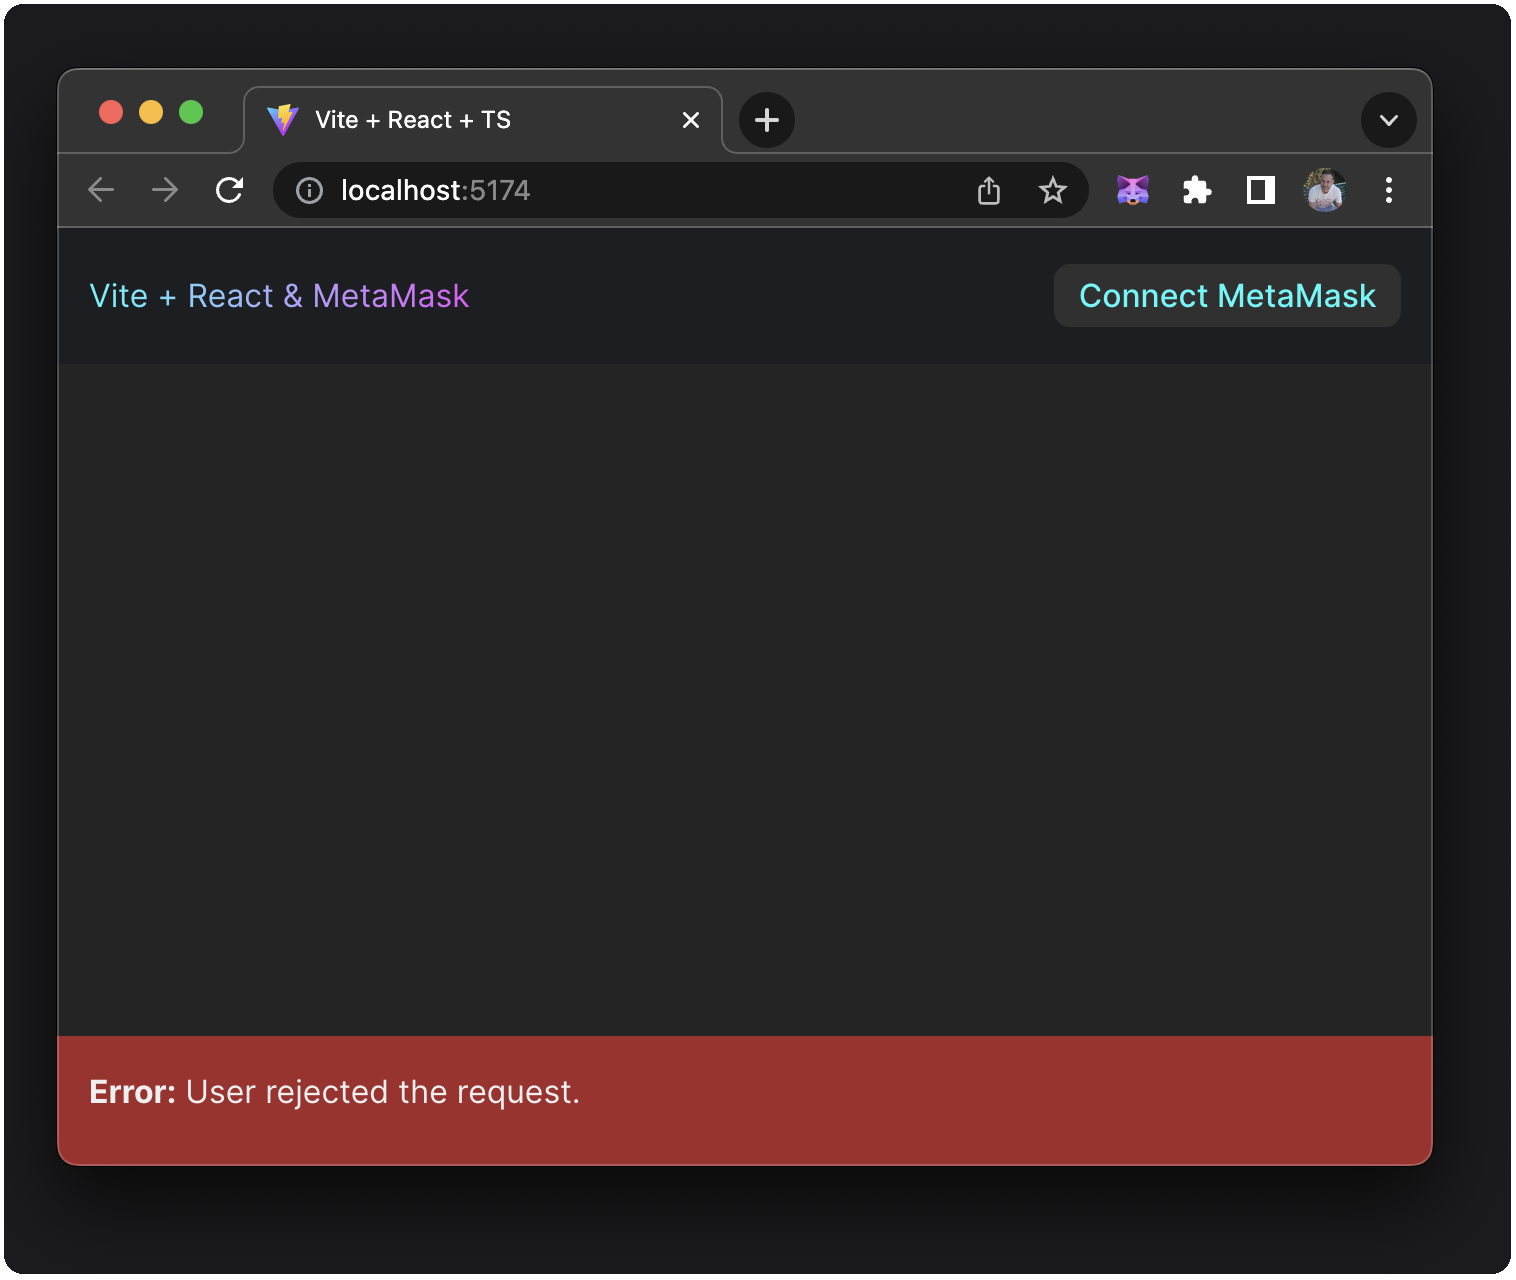
In this tutorial's dapp, you can dismiss any MetaMask error displayed in the footer by selecting it. In a real-world dapp, the best UI/UX for error dismissing would be a component that displays in a modal or overlay and provides an obvious dismiss button.
Conclusion
You've successfully converted a single component dapp with local state to a multiple component dapp with global state, using React context and provider. You can modify the dapp's global state using functions and data that, when used anywhere in the dapp, will show up-to-date data associated with your MetaMask wallet.
You can see the source code for the final state of this dapp tutorial.